You’re Invited! – An Exercise in HTML and CSS
For this past week, one of our assignments in my Educational Media class was to begin working with HTML and CSS. As a “website customizer,” I’ve been around HTML and CSS for quite a few years now, but never really dug into it. I just know enough to get by and never really took time to actually learn about it. One of the things I’ve always wanted to know more about is CSS and how to properly use it. In the past, when it came to CSS, I was very familiar with the concept but didn’t really understand how it was structured. Sure, if I had a problem with my content and it was CSS related, I could go in and play with it until I got it how I wanted it. But I never really “knew” what I was doing.
Another thing I have always been interested in is structured data in HTML. Structured data is a way to give your HTML meaning so that when it is read by a machine or bot, it’s more accessible and rich. Never really sat down and learned the theory behind it and how to properly use it, but his assignment gave me the opportunity to do just that. And, as I stated in my last post, never really considered accessibility in my content…much to my shame.
So, that brings us to this assignment. Our exercise was to create an invitation to a party using HTML and CSS. In an effort to learn more about HTML, I took the HTML5 Structure, Syntax, and Semantics course on Lynda.com. Great class for anyone that has a little bit of a background in HTML that wants to learn more and give their HTML more meaning. For the CSS portion of the assignment, I reviewed the CSS Tutorial on w3schools.com.
With the training in mind, I opened up a text editor and just stared at the blank page. Crickets…. Couldn’t think of what to create. And then I remembered that my youngest daughter just recently had a birthday party and my wife made some really cool Pokemon birthday invitations. So…with that as my inspiration, I started designing. One of the things I took away from the HTML5 course is to just create an outline of your content, and then start marking up from there. So, I put all of the info about the party in on the page and then started playing around with headings, paragraphs, structured data, links, and etc. I then went back and styled the data using an internal style sheet. This is what I came up with:
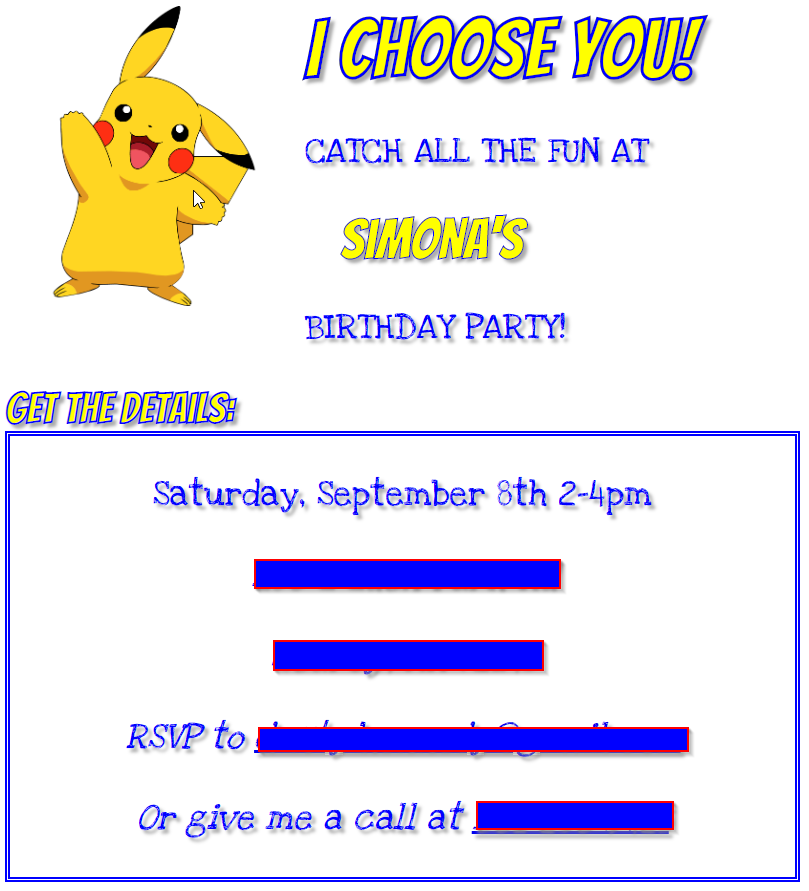
All of it was done with HTML or CSS. Granted, the Pikachu image was linked from another source, but everything else is HTML5 or CSS.
A couple of the things I ran into was trying to provide a bit more depth to the content. I didn’t want to just have regular font on a page with the details. I knew I wanted different fonts and I knew I wanted them to pop off the page, but how do I do that?
One thing you have to consider with fonts is that not everyone has the fonts on their computer that you have on your computer. The question then becomes, “How do I make sure they see what I see.” Luckily, I found that Google has you covered. You can go to Google Fonts and select from close to 900 different fonts to include in your project. Once you select the fonts, you’re presented with a piece of code to insert in your document that references an external stylesheet hosted at Google. So, that solved the problem of fonts.
Now, I had to make the content pop and give it some depth. I used an <h1> and <h2> tag for the different sections: I Choose You and Get the Details, respectively. I knew I wanted the words to be yellow so that they fit with the Pikachu color scheme, but bright yellow on top of a white background doesn’t pop. So, I thought, “Man, it’d be nice to outline the letters with blue.” So…to Google I went. I found I could use the following CSS:
-webkit-text-stroke: .5px blue;This created a blue outline around the letters. I really liked the effect, but it still just laid on top of the page. I wanted to create a 3D effect by giving it some shadow. So I wondered if you can give it an outline, surely you can add a drop shadow effect with CSS. And Google told me I could:
text-shadow: 4px 4px 4px #aaa;With that style defined, I really like the look of the page. Additionally, I used ids and classes in CSS to add to the look and feel. I created an “upper” class that consisted of a text transform that made everything uppercase. I also used different ids and classes for my daughter’s name and the details section.
From a markup perspective, I coded the RSVP email and phone number to open in the appropriate applications when clicked. Email app would open for email and, if viewed on a mobile device, the phone app when the phone number is clicked. I also use the <time> tag to mark up the date so that an email program might read it and prompt to add it to your calendar.
All in all, it was a fun little exercise and really makes me want to go back to all of my website projects and recode them with Structured Data tags. But…that may have to wait until the semester is over and I have a little more time on my hands.

Recent Comments